Home » Without Label » Water Damaged Cabinet Bottom / How to Fix Water Damaged Cabinets & What to Look For ... - * repairing a water damaged cabinet bottom by placing a new piece of wood on top.
Water Damaged Cabinet Bottom / How to Fix Water Damaged Cabinets & What to Look For ... - * repairing a water damaged cabinet bottom by placing a new piece of wood on top.
Water Damaged Cabinet Bottom / How to Fix Water Damaged Cabinets & What to Look For ... - * repairing a water damaged cabinet bottom by placing a new piece of wood on top.. If your sink was leaking, you may have woken up to a puddle of water sitting on the bottom of your cabinet shelf. Create a mixed solution of baking soda and water (1/2 cup baking soda & 1 gallon of water) and sponge the solution on the brushed woods. In this post, i'll cover how to protect your cabinets from water damage and list best products to add to your cabinets today! Because of the proximity to water sources—plumbing lines leading to a sink, dishwasher floods, overflow from a sink, faucet leaks—cabinets frequently end up affected by water. We'll never understand why cabinetmakers use particleboard for the base, but they do.
If it is a little more severe, or you feel that the common household items will not help, you may need to replace the cabinet. Then use sandpaper to buff the swollen areas. Drying cabinets after a water damage incident is a specialized process. Bloating from water damage on any of the wall components will cause tiles to loosen and pop off. Remove the door and drawer cut out the damaged area that is below the cabinet's bottom line.
How to Replace the Bottom Piece of Wood Under My Kitchen ... from i.pinimg.com What do you need to start? We'll never understand why cabinetmakers use particleboard for the base, but they do. Water damage is not uncommon in an under sink cabinet. Apply a sealer to the wood filler and vacuum the area to remove wood particles and dust. These are possibilities of how the water can leak and run undetected along the floor and then wick up into the material sitting on the floor. Before applying the oxalic acid to the surface of the cabinets, use your sandpaper to sand down the surface. In that case, you'll need your cabinet bottom repair. When the solution is dry, you should notice an improvement in the appearance of the wood.
The were tiles were from the depot and only cost $0.86 each.
Whether you have existing cabinets with a bit of wear and tear or a brand new cabinet, protecting against water damage to the cabinet bottom is easy and affordable. But you don't have to cut out the entire bottom. Then clean the bottom with a 50/50 mix of vinegar and water. Apply a sealer to the wood filler and vacuum the area to remove wood particles and dust. I am not a carpenter and this video is for entertainment use only. If you have slight water damage, it is pretty easily fixed. Instinctively, the first thought is to replace the whole cabinet. Drill some vent holes in the toe base, as high as possible to allow for ventilation, so things can dry out underneath. In that case, you'll need your cabinet bottom repair. You may need to remove tiles to drill aeration holes in the green board. Well, the veneer swells and crumbles. If the boxes have only small spots of damage (especially on the edges and non load bearing spots) you may be able to sand the damaged areas and seal them with wood glue or latex paint, but it will only be a cosmetic repair. * repairing a water damaged cabinet bottom by placing a new piece of wood on top.
Water damage is not uncommon in an under sink cabinet. If soaked in water for any extended period of time, you'll want to replace your cabinets to remove residual moisture that could wreak havoc Bloating from water damage on any of the wall components will cause tiles to loosen and pop off. Water damaged cabinets will often become swollen, causing paint to chip off or laminate to bubble up and ruin the finish. The were tiles were from the depot and only cost $0.86 each.
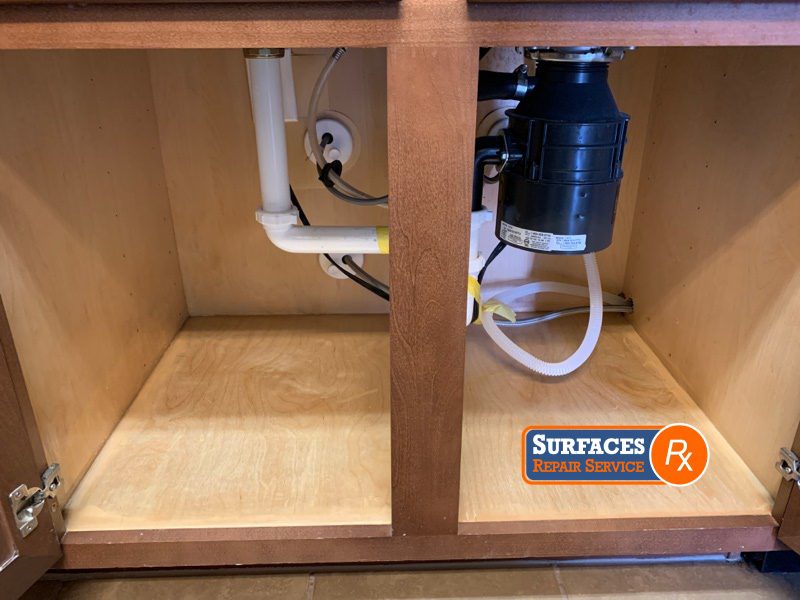
Water Damage Repair: Wood Under the Kicthen Sink Cabinet from www.surfacesrx.com If soaked in water for any extended period of time, you'll want to replace your cabinets to remove residual moisture that could wreak havoc Whether you have existing cabinets with a bit of wear and tear or a brand new cabinet, protecting against water damage to the cabinet bottom is easy and affordable. Because of the proximity to water sources—plumbing lines leading to a sink, dishwasher floods, overflow from a sink, faucet leaks—cabinets frequently end up affected by water. The were tiles were from the depot and only cost $0.86 each. You might not have to. And once it starts swelling, your only option is to replace it. For the top use a putty knife to scrape off what is loose. Replace these holes with wood filler.
In that case, you'll need your cabinet bottom repair.
I am not a carpenter and this video is for entertainment use only. * repairing a water damaged cabinet bottom by placing a new piece of wood on top. Then, you can spray some cabinet mold killer through the holes. Let's face it—it's easy to get water on the floor of your sink base cabinet. Remove the door and drawer cut out the damaged area that is below the cabinet's bottom line. If you have slight water damage, it is pretty easily fixed. Steps in fixing a water damaged cabinet bottom. Blushing is common in older pieces as condensation permeates the lacquer or shellac finish. Drill some vent holes in the toe base, as high as possible to allow for ventilation, so things can dry out underneath. Replacing water damaged sink cabinet. Well, the veneer swells and crumbles. These are possibilities of how the water can leak and run undetected along the floor and then wick up into the material sitting on the floor. Because of the proximity to water sources—plumbing lines leading to a sink, dishwasher floods, overflow from a sink, faucet leaks—cabinets frequently end up affected by water.
Vacuum up all the particles. If you decide to just lay a new piece of wood on top here's a suggestion. Create a mixed solution of baking soda and water (1/2 cup baking soda & 1 gallon of water) and sponge the solution on the brushed woods. As you can see, this cabinet experienced some water damage over the years. Damp, rotten particleboard holds water, which promotes mold and mildew.
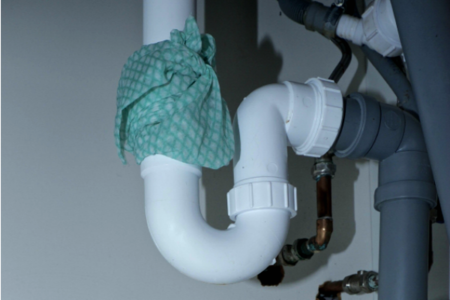
Repairing Water Damage in Your Under Sink Cabinet ... from cimg3.ibsrv.net If the boxes have only small spots of damage (especially on the edges and non load bearing spots) you may be able to sand the damaged areas and seal them with wood glue or latex paint, but it will only be a cosmetic repair. Also, often the water also causes damage to your cabinet bottom. Blushing is common in older pieces as condensation permeates the lacquer or shellac finish. Use clear water to wash the woods and let it dry. The most common location of water damage to cabinets is of course at sinks or at the sides and bottoms of base cabinets adjacent to a leaky dishwasher (our two photographs above). I am not a carpenter and this video is for entertainment use only. The whole project cost a grand total of $6. Usually a piece of standard thickness formica is good to use on the inside.
Let's face it—it's easy to get water on the floor of your sink base cabinet.
These are possibilities of how the water can leak and run undetected along the floor and then wick up into the material sitting on the floor. This quick video demonstrates one method we use. It is important to determine if the water got through the tile layer to the green board or if the water was wicked up from the bottom of the green board. Drill some vent holes in the toe base, as high as possible to allow for ventilation, so things can dry out underneath. * repairing a water damaged cabinet bottom by placing a new piece of wood on top. If it is a little more severe, or you feel that the common household items will not help, you may need to replace the cabinet. Spray any mold or mildew growing inside the cabinet, under or around the removed bottom, with your choice of solutions: If your sink was leaking, you may have woken up to a puddle of water sitting on the bottom of your cabinet shelf. The whole project cost a grand total of $6. As you can see, this cabinet experienced some water damage over the years. If you decide to just lay a new piece of wood on top here's a suggestion. Remove the door and drawer cut out the damaged area that is below the cabinet's bottom line. Create a mixed solution of baking soda and water (1/2 cup baking soda & 1 gallon of water) and sponge the solution on the brushed woods.